Assembly Instructions

INSTRUCTIONS:
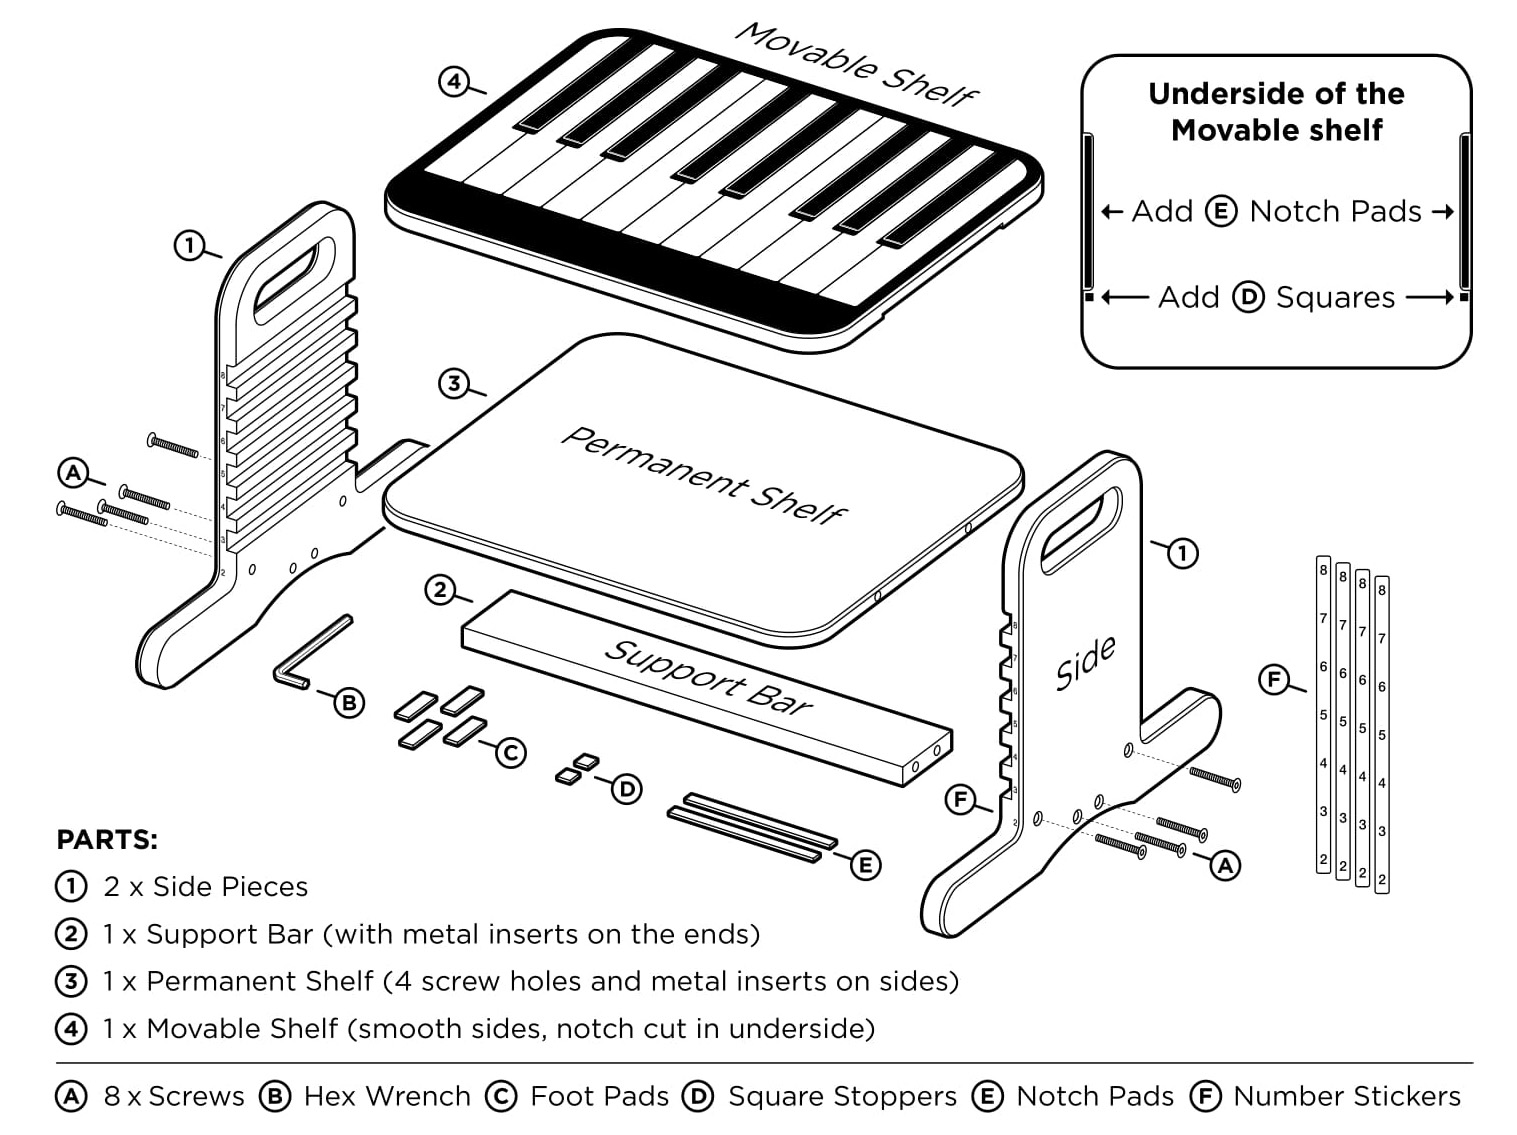
⚠ Do NOT use electric tools to tighten screws. Hex Wrench ONLY!
- There are metal inserts in the wood boards to accept the 8 machine screws. Until you reach step 8, only snug the screws lightly, stopping when the two pieces of wood touch.
- Put 1 screw through the outside of one Side Piece, in a lower center hole, and screw into the corresponding insert in the small Support Bar using the hex wrench.
- Put the 2nd screw through the same side, into the bar, but do not tighten either screw completely.
- Attach the other Side Piece to the Support Bar, using 2 additional screws.
- Set the Footrest on its 4 feet, on a firm smooth flat surface. Position the Permanent Shelf between the Side Pieces, resting on the Support Bar, with the screw holes against the Sides.
- Insert the 4 remaining screws through the Sides, and into the inserts in the Permanent Shelf. Tighten only until the screws stop turning easily.
- Center the Movable Shelf in a middle slot. Press down firmly on the Sides, making sure the Footrest is resting firmly and squarely on all 4 feet.
- Tighten the 4 upper Permanent Shelf screws VERY tightly, using the long arm of the wrench for leverage. (If all 4 feet do not still sit firmly and squarely on the floor, loosen screws until the Footrest sits flat, then tighten the screws again.) Then gently snug down the 4 lower Support Bar screws, but do not crank on them.
- Peel the backing off 1 of the little Square Stoppers, and stick at the end of one notch on the underside of the Movable Shelf. (NOT down in the notch itself.) This will stop the shelf from sliding all the way through and into piano. Repeat with the 2nd Square Stopper. See diagram above.
- Peel the backing off a Notch Pad, and attach it the length of one notch on the underside of the Movable Shelf. Repeat on the other notch. These two pads will reduce movement and noise.
- If you are using the Footrest on a smooth floor, you should attach the 4 protective foot pads.
Side Adjustment
When you assemble your Footrest, and tighten all 8 screws very firmly, the sides should be straight up and down. These are machine screws, and tightening them firmly will not strip the wood.
Usually, tightening the 4 “wide apart” screws on the permanent shelf VERY firmly will keep the sides straight, and nothing more is needed. Try this first.
But wood can flex and bow slightly after production. It is possible for the sides to be slightly farther apart up by the handles, compared to the lowest slots.
In an extreme case, the shelf may not rest firmly in the top couple slots, and can fall down on one side.
If that happens, here is a simple adjustment to bring the handles back in together permanently:
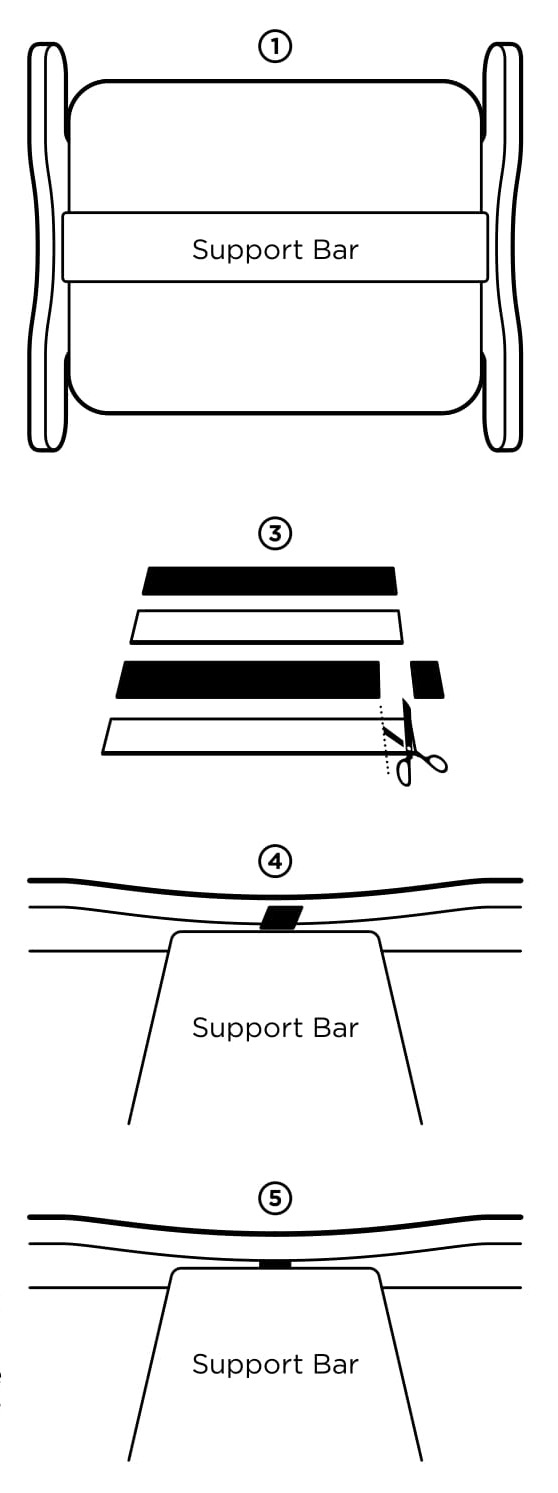
- Turn the assembled Footrest upside down, resting on the handle area of the sides.
- Loosen all 8 screws with the hex wrench until the sides wobble, and seem “loose.”
- Take two of the black/yellow foam footpads, and trim one thin slice off the end of each one.
- Slip one slice of foam on each side, between the support bar, and the sides. If you can’t slip it in easily, loosen the screws on that side a little more. They will fit between the 2 support bar screws.
- Slide the foam down, so most of it is out of sight. Once in place, snug the 2 support bar screws. Do both sides. Don’t crank on them, just snug them down. (They are the 2 screws very close together.)
- Now re-tighten the 2 screws holding the permanent shelf. You can use the LONG side of the hex wrench for leverage, and firmly tighten them down. (They are the screws very far apart.)
- Then snug the 2 support bar screws again more firmly.
- When you have done this on both sides, you will have angled the sides inward just slightly up by the handles, and created a tighter fit for the movable shelf at the upper slots.
- If you find the handles are now too close together for the shelf to slide easily in the top slot, you can simply remove a foam shim from one side, to reduce the angle.
- Keep the hex wrench handy, since wiggly feet can loosen screws over time. If you like, a drop of “blue” LOCTITE® on the threads will keep the screws from loosening, while still allowing dis-assembly in the future. (“Red” LOCTITE® is permanent, and is not recommended.)
